Our veterinary education videos feature our top-of-the-line flexible endoscopy equipment. This video will walk you through the cleaning of the system.
Gastroscope Cleaning & Maintenance Guide
Proper cleaning and maintenance of your VetOvation gastroscope protects your investment and ensures safe, reliable performance for every procedure. Developed by a team of veterinary clinicians and industry experts, this protocol reflects VetOvation’s commitment to keeping your practice running at its best. Follow these steps after each use to keep your scope in optimal condition.
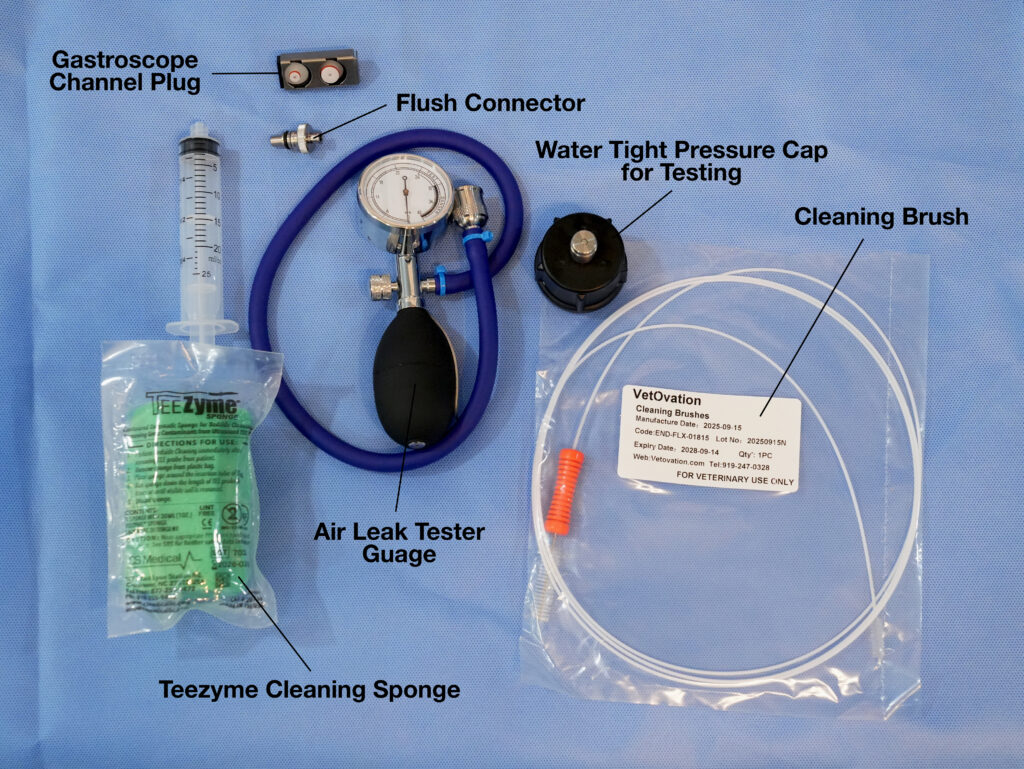
Have the following available during cleaning:
Step 1: Pre-Cleaning Flush of Each Channel of the Gastroscope
Before extubating your patient, perform a quick bedside flush to prevent tissue and debris from drying inside the scope channels.
- Fill a dog food bowl with distilled water and add Teezyme pre-mixed chlorhexidine enzymatic cleaner.
- Place the tip of the scope into the solution and cycle through each button:
- Blue button (half press) — delivers air into the bowl for ~10 seconds, clearing the air channel
- Blue button (full press) — delivers a spray of water to flush the water channel
- Blue button (half press again) — repeat air cycle
- Red button — suctions the diluted chlorhexidine solution up through the scope channels and into the suction canister for ~10 seconds, flushing the suction channel
- Wipe down the tip of the scope with a sponge to remove any gastric contents or fluids.
- Hang the scope on your gastroscope hanger, extubate your patient, and proceed to the full cleaning process shortly after.
Step 2: Air Leak Test
Before immersing your scope in water, always perform an air leak test to ensure no internal damage is present.
- Protect the signal connector — never allow this area to get wet, as moisture can cause serious damage. Attach the air leak test cap, screwing it on firmly to seal the connector.
- Attach the air leak test gauge and inflate to the test zone on the gauge dial.
- Hold for approximately 10 seconds and observe the gauge:
- Gauge holds steady — scope has passed the air leak test and is safe to immerse
- Gauge drops — air is escaping, indicating a potential breach; do not immerse the scope and contact VetOvation immediately
Step 3: Prepare the Scope for Immersion
Before submerging your scope, remove and protect the appropriate components:
- Remove the blue button, red button, and instrument port button by pressing, holding, and pulling each one out
- Insert the protective plug over the two button ports until it clicks into place
- Do not remove the picture button or video button on the back of the scope
Step 4: Full Immersion Cleaning
Use a dedicated 28-quart Rubbermaid tub — the ideal size for a gastroscope.
- Submerge the scope and attach the luer lock cleaning adapter (included in your case) to a 30–60 cc syringe.
- Insert the adapter into the water port and flush through 4–5 times, ensuring a strong, visible stream of fluid exits the distal tip of the scope. This clears any debris trapped in the channels.
- Repeat the same flush process through the instrument cleaning port — again, confirm a strong stream exits the distal tip.
- Use a clean sponge to wipe down the distal tip and the scope handle.
Step 5: Channel Brushing
At the end of the cleaning process, brush through each channel to remove any remaining debris:
- Run the cleaning brush through the instrument cleaning channel until it exits the distal tip. Wipe the brush before pulling it back through.
- Insert the brush into the red suction channel (note: enters at a slight angle) and pass it through the full length of the scope.
Step 6: Drying the Channels
To prevent moisture buildup inside the channels:
- Fill a 20 cc syringe with a small amount of alcohol.
- Flush alcohol through each of the following:
- Instrument port
- Blue button hole
- Red button hole
- Hang the scope and allow the channels to air dry completely.
Scope Storage & Hanging
For drying and storage, VetOvation recommends:
- A rake hook from Home Depot or Lowe’s mounted in an out-of-the-way location
- Padding the hook with air conditioner insulation tubing or a pool noodle (available at Dollar General) to protect the scope during hanging
This keeps your scope safely suspended, channels open, and free from damage during the drying process.
The VetOvation Team
This cleaning protocol was developed and refined by the clinical and operational experts behind VetOvation — the leader in veterinary endoscopy.
Les Meadowcroft — CEO, VetOvation Les leads VetOvation’s mission to bring professional-grade endoscopy technology and support to veterinary practices of every size. His focus on long-term value means VetOvation doesn’t just sell equipment — it equips practices with the knowledge and protocols to protect their investment for the long haul.
John Schaaf, DVM — Retired Practice Owner & Chief Medical Officer, VetOvation As a practicing veterinarian and practice owner, Dr. Schaaf knows that a well-maintained scope is essential to a smoothly running practice. His real-world clinical experience directly informs VetOvation’s maintenance standards, ensuring that every recommendation is practical, proven, and easy to implement in a busy clinical environment.
Jessica Larson, DVM, DACVIM — Director of Education, VetOvation Dr. Larson is a board-certified internal medicine specialist who oversees all of VetOvation’s training and educational content. Her clinical depth ensures that cleaning and maintenance protocols like this one are not just technically sound, but clearly communicated so every member of your team can follow them with confidence.
Lennie Friedman — COO, VetOvation Lennie keeps VetOvation running at its best — both operationally and in the field. As the go-to resource for equipment repairs and troubleshooting, he ensures that practices experience minimal downtime and maximum performance from their VetOvation systems. His hands-on expertise means that when something needs attention, it gets resolved quickly and correctly.
For questions about scope maintenance or to report a failed air leak test, contact VetOvation directly.