If you need to print this PDF or save for later
click below to download your copy.
[button size=”medium” style=”secondary” text=”Download PDF” link=”https://vetovation.com/wp-content/uploads/2021/01/Plasma-quick-start-guide.pdf” target=”none”]
FPS-15s Plus Quick Start Guide
1. Preparation
- Prior to loading into the FPS-15s Plus Sterilizer, all items must be well cleaned, rinsed and thoroughly dried.
- Pack all items to be sterilized into the appropriate bags or wrap making sure to include a chemical indicator strip or tape.
- Place peel pouches with the white side facing up. Do not stack small items under larger items, and do not overpack the sterilizer more than 75% full.
- For Full Chamber loads, install the Sterload cartridge before adding items to be sterilized.
2. Warm-up and Starting
- Turn on the main power switch which is located at the rear side of the gas plasma sterilizer.
- Close the door during preheating process for warming up which will take 20 to 30 minutes.
- After the preheating process, the “Sterilize” icon will appear on the display instead of the “Preheating” icon.

- Place the Sterload cassette or Sterpack pouch in the loading block as depicted below and close the door securely.
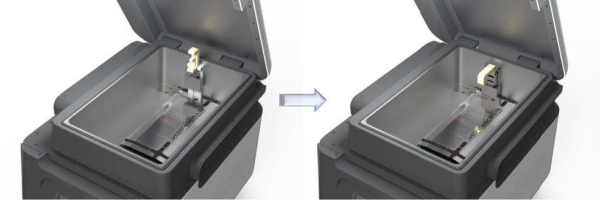
- Touch “Sterilize” icon to start sterilization cycle
3. Plasma Sterilization Cycle
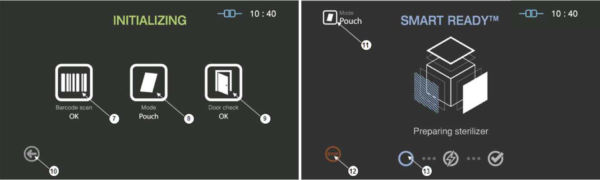
- The plasma sterilizers automatically scans the barcode printed on the cassette to check validity of the load and determine the operation mode. It also checks the door status before starting the sterilization cycle. There will then be informational messages to show the progress of the sterilization load.


- Should a cycle need to be cancelled before completion, touch the “Stop” button and the screen will ask for a cancellation confirmation. After cycle cancellation is initiated, that process cannot be stopped by the user.

- After the cycle has been completed, gloves should be worn to remove the items and the sterilization cassette from the chamber. The sterilization confirmation is then obtained by inspecting the chemical indicator tape and/or strip.